Wednesday, September 18, 2013

Discovering the New

Have you ever met those people who can just find stuff? $20 note? No problem! Rare animal? Sure! Satellites at day time? What's so hard about that?

Well, I'm not one of those people.

I'm always the last to see, hear, do anything. So when we were out camping on the weekend, and I spotted a wildflower I'd never seen before, I made my husband stop in the rocks so I could run out...in my socks among the thorns...to take a photo, thinking I had struck something amazing - a wildflower I had never seen before that was redder than the rocks!

Canon EOS 50D (Betsy), f/18, 1/250 sec shutter, ISO 500, 200mm, manual mode with polarizing filter. Contrast, brightness and white balance adjustments in Adobe RAW. 
Turns out, there were quite literally squillions of these things in patches dotted up the riverbed. The seeds must be carried down when the river is in flood and deposited in small patches - they only grew in the river bed and I have never seen them anywhere else!

I tell you what though, the red was absolutely stunning! It made me think of the Poppy scene from the Wizard of Oz. I even started yawning! If anyone knows what these lovelies are, I am all ears.

Like I said, a more vibrant red than even the rusty iron-ore clad rocks! Betsy, f/18, 1/250 shutter, ISO 500, 20mm, manual mode with polarizing filter. White balance, contrast and vibrance adjustments in Adobe RAW
P.S. If I find out these are weeds, I will surely die!

Saturday, September 14, 2013

Pilbara Gems: Wildflowers - Part 2

Of course, you can't focus on wildflowers without a nod to another of the region's most prolific and definitely one of the most impressive flowers I've ever seen. Sturt's Desert Pea is technically the floral emblem for South Australia however in our travels the place where desert peas were most prolific is here. It is astounding. They are like tongues of fire spreading across the ground.

Betsy, f/10, 1/800 shutter, ISO 500, -0.3 step exposure bias, 50 mm, shutter priority

Betsy - f/14, 1/800 second shutter, -0.3 step exposure bias, ISO 500, 130 mm,  Shutter Priority
I must admit, I am a little obsessed with these little gems - they are stunning! I can't count how many times I have taken pictures of these. What is particularly remarkable about these guys, is that they are not always black and red...more of that to come!

Sunday, September 8, 2013

Pilbara Gems: Wildflowers–Part 1

September is the time of year when Western Australia comes alive with wildflowers – well, most of it anyway. Most people may think of the wildflowers down the south west corner – kangaroo paw and the like. Here in the Pilbara though, the wildflowers bring life and colour to the otherwise arid, spinafex covered landscape. And we aren’t just talking one or two here, no. A whole sea of colours – pinks, yellows, oranges, whites, blues, reds, blacks, maroons, purples, greens, browns…just to name a few.

In celebration of September and the coming of spring (ignoring the fact that we are already getting days above 35 degrees Celsius) I would like to highlight some of the incredible and unique flowers that have graced the landscape.

To begin with, I would like to focus on the Mulla Mulla – purple at first glance, but upon further investigation are full of different shades, as well as whites and contrast nicely with the green leaves.

Betsy, with f/8, 1/640 shutter, ISO 500, -0.3 step exposure bias, 200 mm, shutter priority. Taken in the morning and displays the wonderful way these flowers grow and their prolific nature.  


Betsy, f/18, 1/320 second shutter. ISO 500, -0.3 step exposure bias, 185 mm, aperture priority. My favourite point of view of the Mulla Mulla. 
Mulla Mulla are likely the most prolific where we are. They do come in shades of green and white. There are also a number of different varieties that are different shades of purple. When they grow, they get longer and longer and they are surprisingly soft.

Wednesday, August 28, 2013

Playing with Colours

A whole new world has opened up to me with editing RAW photos and playing with colour hues, gradients, balance and levels. On the one hand I feel they create a much more dynamic feel to the photo, but on the other hand other hand, some colours are lost in the process. Particularly in sunset shots. Numerous times I have edited a sunset photo, and when compared with the original, the range from orange to blue has lost its complete gamut. Still, it's an enjoyable past-time, although it is increasingly becoming apparent that proper training is required, although sometimes when you edit, you just feel your way. Most photos are over edited in my opinion anyway.

Check out this photo I took at Point Samson recently. The light was perfect - the hour before sunset, but that didn't stop me increasing the magenta hue to add a touch of purple. It's no secret that purple is a personal favourite of mine!


Canon EOS 50D, f/5, 1/32000 second shutter, ISO 500, 18mm, three shots stitched to form panorama. White balance and colour adjustment in Adobe RAW

Saturday, August 24, 2013

Lesson #8 & #9: The remote, the lens and explosions of colour

There are few moments in life where one can sit back and do absolutely nothing and be entertained completely at the expense of others. I am of course speaking literally here – sitting back at a show that has free entrance, watching a fireworks display. I shudder to think how much money these explosions of colour cost, but my goodness are they fun to watch! They are also particularly fun to photograph, as I found out a few weeks ago.

I have had grand intentions of photographing fireworks in the past with zero success – this year is the first opportunity I have fully taken advantage of. I packed my Betsy, my tripod and by the grace of God, my remote.

We set up in amidst throngs of people underneath huge oval spotlights that I confess, had me worried. I set my camera at a 30 second shutter speed, wide aperture and waited for the show.
The lights dimmed, the first spark went up and it was on.

After three explosions it became clear that 30 seconds was going to be way too long. I set it back to 6 seconds. Again, too long. Some fireworks were clearly brighter than others. A single setting for all was not going to work, and I didn’t want to waste time changing settings, especially when you have no idea what is about to explode overhead! How to fix this? Light bulb moment – almost literally – BULB!

Enter lesson eight: With my remote and the shutter set to Bulb I could press and release as I pleased depending on how bright each blast was. I had to adjust the aperture several times, but towards the end managed to get the hang of the timing of the show and came out with some crackers. The best part? I was able to sit back in my comfy camp chair, watch the show and just press and release my remote! Honestly, most enjoyable way to photograph something! It became an awesomely fun challenge to get the timing right.

Of course, each silver lining comes with a dark cloud. The day before this glorious revelation we had been at the beach. Enter lesson nine: Clean lens after taking Betsy to the beach! Due to some salt spray on my lens, many of my firework photos were rendered useless! Luckily some were not bright enough to make the salt spots shine, so there are a number of usable ones.

So I got a little carried away with how many to put up here, but there were many lessons and many different types. This shot I think is awesome, but for the spotlight in one corner and the salt spot on the other side. I love the shine in the middle and the almost reflection of the two fireworks. Canon EOS 50D f/16, 7 second shutter, ISO 500, 18mm.

Two different types here, great patterns. Small salt spots on the bottom though which is a shame. EOS 50D, f/16, 6 seconds, 18mm.

These guys were interesting. When you watch them they appear as dots of light. When photographed they appear as feathers. It's so much fun. EOS 50D f/22 ISO 500 18mm.

The difference the shutter speed makes - same style as two above, but this time the shutter is only 1 second. EOS 50D, f/22, ISO 500 18mm. I think it looks like a protia flower.

Blue seemed to work well as it was not bright enough to light up the salt spots. Plus there were no fireworks underneath this one which helped. EOS 50D f/22 2 seconds, ISO500 18mm

Probably my favourite because of the different colours and the glitter effect of the gold. Canon EOS 50D, f/22, 2 seconds, ISO 500, 18mm


Not bad for a first time photographing fireworks though! It may not be natural creation, but they are still a creation of colours, and a whole lot of fun!

Just a note that all these images are edit free other than cropping. I needed the full 18mm to capture the whole diameter but it left a lot of dark space that required cropping. Not to mention the salt spots!

Wednesday, August 21, 2013

The Beautiful Desert Rose

One thing that I have always admired about creation is the decorative colours flowers provide. I may be a shocker when it comes to naming a species, but when it comes to admiration, I have it in bucket-loads.

Western Australia is famous for its flowers – this is a well established fact. Not many people think of the Pilbara when it comes to flowers though. The truth is that there are numerous vibrant examples of unique and wonderful natural decorations up here. Some are cultivated but most grow like there is no tomorrow a couple of months after rain.

I may produce another post dedicated to the Pilbara wildflowers, however this one I just want to focus on one flower that is common in pots and gardens up here – the desert rose. I have one, that hasn’t flowered yet, but they are prolific in town green-space and facilities as well as private gardens and they are stunning splashes of pink against strong green with a hardy stem.

I photographed one at a small museum last weekend, and was once again quite amazed at the difference editing the RAW file made. Colours are vibrant and the clarity better. Your can adjust the white balance to ensure maximum impact of colour. The image below was considerably more red in the original. Increased contrast and tweaking the tint to make the image warmer with a slight magenta hue worked wonders.

Canon EOS 50D f/5.6 1/8000 shutter, ISO 500, -1.3 step exposure bias. 70mm. Colour adjustment in Adobe RAW

Saturday, August 17, 2013

The Original Kodak Moment

Remember what I said about not taking photos of anything that moves? Well, sometimes life presents an event that you either say “I wish I had my camera in the car right now!” or “I’ve got to do anything to I can to get a photo – the opportunity is too great!” I call it the Original Kodak Moment. Or making your own luck. Or putting yourself in silly situations just for a photo.

One such moment presented itself on the weekend.

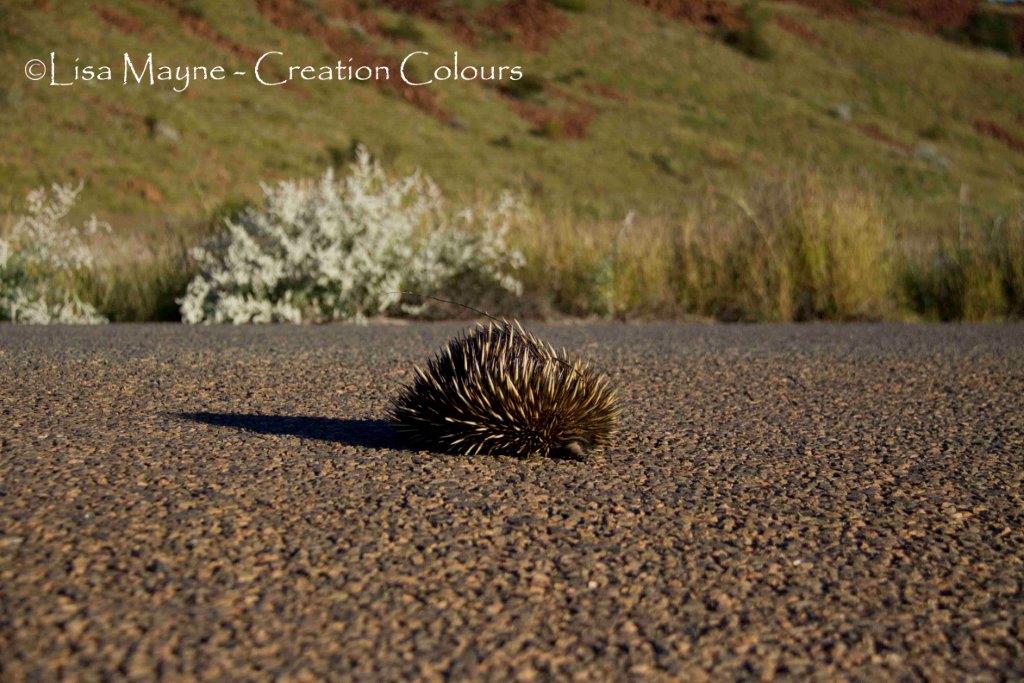
I was driving my little car along an outback road, when suddenly my tires nearly burst thanks to the little guy below running out onto the street! I slowed down, the guy coming the other way stopped, and I raced out with my camera, and my grandmother’s camera who was visiting at the time. Of course, I wasn’t first to the scene of the terrified echidna, but I think my Betsy managed to intimidate the other onlookers a little…oops, that’s really not meant to happen!

So here I am, crouched down on a road where the speed limit is about 80km an hour. It’s a popular road on a weekend as it leads to a nice little cove. Two cars had to swerve to the other side of the road to miss me. I’m sure they thought I was quite mad but let’s face it: you don’t want to hit one of these guys with your car!

Pilbara Echidna. Canon EOS 50D f/4.5 1/6400 shutter, ISO 500, +1 Step, 50mm, shutter priority setting. So this picture is boringly composed - who puts the subject almost of dead centre? - but I like it because it shows the echidna literally in the middle of the road, with the gorgeous Pilbara colours behind and even a bush of some wildflowers! Plus I like how the echidna is in focus. Why does he have a stick on his back I wonder? Fancy Dress? Not likely.

Canon EOS 50D f/5.6 1/6400 shutter, ISO 500, +1 Step, 110mm, shutter priority setting. I like the shape of the echidna in this picture, and the pattern his spikes make. I'm still confused about the spike - I wasn't game enough to remove it on the day, I'm a chicken! The only thing that could have improved this picture is getting his eye. I only caught a brief glimpse of it, but my father always said when photographing wildlife, get the eye in focus or else it's worthless! And the threat of speeding traffic should be no excuse, not to the real amateur photographer!


Normally I would remove such a gorgeous creature out of the way on my departure (generally by chasing it, yes) but to tell you the truth I was a little intimidated by those spikes! When left alone however, he quickly scampered off into the bush so no harm done. Well other than the fright of its life!

At the end of the day, if it moves it’s difficult, but if it refuses to move out of shear fright it’s fair game!

Saturday, August 3, 2013

Chasing Egrets

I’m not one for patience when it comes to photographing wildlife. I have a rule – if you can’t sneak up on it, don’t bother. This is because whenever I do bother I manage to scare the animal, bird or insect away. Rule one basic photography – anything that moves is difficult!

I rely on the ‘right place, right time’ principle. And luck. Not a lot of it comes my way to be honest.
We took a little adventure on the weekend to a waterhole by the highway. One of those places that exist in the realms of mud-maps with ‘turn-left-at-the-jerry-can’ directions.

So, the gorge was gorgeous, and we were spoiled with a wildflowers and bird-life. Several flew overhead, hid behind rocks and dove for fish. Of course I was waiting for my husband who was busy spraining his ankle, so I decided I might just do a bit of bird chasing.

Let me tell you how this normally goes: Bird flies over, lands just out of reach of the 200mm, I stand quietly, reach for the camera…and the bird flies away. If I am lucky enough to have the camera on me, is sneak, then snap, snap, snap while whatever I’m photographing flies, runs, scampers away. Normal results are nothing.

This particular day however, a couple of egrets flew over. After two attempts of sneaking up, I kept the camera close by. One of my snapping sprees yielded this. 

Canon EOS 50D f/5.6 1/6400 shutter ISO 500 +1 setp 150mm. Cropped. Shutter Priority
 The cropping diminishes the quality, which is a shame. It has been heavily cropped, and colours slightly edited and enhanced in Photoshop RAW.

Saturday, July 27, 2013

Instagram & Karijini - Match made in Heaven?

I know I've written about Instagram before. It is a marvelous program that seems to have the ability to turn every photo into a masterpiece. Nearly - it doesn't seem to work that well for me.

It does seem to bring out the colours of Karijini quite nicely.


But it does frustrate me a little bit. OK, more like a lot. I'm not sure why, it just does. It's given terrific photos to your fingertips - instantly - but you can't actually do anything with them! They are too small to print, they are square, and I get really tired of the presets.

Have I mentioned how great it is for Karijini though? It does do a marvelous job of highlighting the colours, enhancing the shadows an creating interesting images.

Monday, July 22, 2013

Pilbara Gems: Python Pool

The landscape of the Pilbara is vast and arid. There are continuous subtle changes for those driving for more than an hour that may go unnoticed to the unappreciative eye. For those willing, there are a number of small but precious gems scattered across the region.

Python Pool is one – situated in Millstream-Chichester National Park, it is a local haunt when it has had a flow. Sure, it’s not the grand canyon, it’s not even Karijini, but for a relatively short drive, it’s refreshing.

Not to mention the drive out there is spectacular. I am planning a trip out there soon – we have had a lot of rain and I can just imagine the wildflowers that will be gracing the roadside!
My last visit to Python Pool was in April this year. I am only showing you the photos now because I was about to format my card when I realised  I hadn’t backed these ones up yet. Always, always double check!

Python Pool. Canon EOS 50D (Betsy) f/3/5 1/400 ISO 200 +2 step exposure bias 18mm, shutter priority
Dragonfly Python Pool. Canon EOS 50D (Betsy) f/5.6 1/400 ISO 200 +2 step exposure bias 200mm, shutter priority


Dragonfly Python Pool. Sitting on my camera bag. Canon EOS 50D (Betsy) f/5.6 1/400 ISO 200 +2 step exposure bias 200mm, shutter priority

Friday, July 19, 2013

How to Harass your Husband

I am in no way, shape or form, an early morning riser. My husband calls me a morning zombie. I do not function without coffee and even then it takes a good hour for full brain functionality to flow.

We recently purchased some kayaks, one thing I have always wanted to do. In order to fit it into our busy schedule last weekend, we decided to ditch cleaning the house on Saturday morning and go kayaking instead. This of course meant getting up at 6am. At the moment, this requires rising before the sun, which according to myself, humans are not supposed to do.

We trundled out to Cleaverville Beach, which is midway between Karratha and Roebourne. It’s known to be infested with two things – flying creatures that bite you and grey nomads.

We pull into the ‘boat ramp’ (that is, a muddy gap in the mangroves) and I immediately start helping my husband unload the kayaks…or would have if I didn’t have Betsy in the car and decide a better use of my time was taking advantage of the early morning sun. I so rarely get to see the light after sunrise due to my not-so-rare condition!

This of course is a perfect way to annoy your husband, especially one who was up half an hour before you packing the kayaks. My photography adventures with him are all about balance – photos, being with him. Hence, on this occasion, not too many photos were taken. I tried to be a good wife.

Cleaverville Boat Ramp. Canon EOS 50D (Betsy) f/3.5 1/8000 shutter, ISO 500, +1, 18mm. Cropped. Edited in Photoshop Adobe RAW

Canon EOS 50D (Betsy) f/3.5 1/8000 shutter, ISO 500, +1, 18mm. Cropped. Edited in Photoshop Adobe RAW

Sunday, July 14, 2013

PS: Pirate Instagram

Just as a postscript to the previous post, I also snapped this Instagram of Pirate Cove, just to prove how impressed I was with the colours! (I was also impressed there was phone reception there…not so remote after all!)


Saturday, July 13, 2013

Pirate Panoramas

Arrr, She’s at it again!

I finally have a weekend where I can sit down on a Saturday morning, drink my coffee and edit my photos. Unfortunately I haven’t been out much taking photos lately. To tell you the truth, I’m struggling to find new inspiration. There are only so many times you can climb the Karratha Hills and take photos of the sunset!

Last month I had the opportunity to go out on a charter boat to some of the islands of the Dampier Archipelago for a social function. Of course I took Betsy with me, despite the threat of rain. I must confess, I took some okay photos of the local rock art, but I am unsure of whether or not it is appropriate to post them on here. You may see those pop up in the near future, but for now I will focus on the shots I took of a place called Pirate Cove.
We climbed the rocks and there were some amazing colours. I’d wager you would be hard pressed to find these colour combinations anywhere in the world – Iron rust red, sandy yellow, ocean blue, mangrove green, black and grey all contrasting stunningly with the turquoise water. It’s spectacular.I was left behind by the group at one point (this is actually a frequent occurrence!)

This series shows some experiments – and that there are a number of ways to skin a cat.  Some are better than others. All edited in Adobe raw, with presets for the stitching, they still don’t quite fit together which is unfortunate. The sun just didn’t do as it was told! Which one is your favourite?

Also bear in mind I was clambering over unstable rocks…in bare feet. Real smart.

Canon EOS 50D (Betsy), f/3.5 1/800 sec ISO500, +1 step exposure bias, 18mm. Auto white balance, Shutter Priority mode. Five portraits stitched in Photoshop. Edited in Adobe RAW to enhance colours


Canon EOS 50D (Betsy), f/3.5, 1/8000 sec shutter, ISO 500 , +1 step exposure bias, 18mm, shutter priority. Two landscapes stitched in Photoshop. Edited in Adobe RAW to enhance colours.

Canon EOS 50D (Betsy), f/3.5, 1/8000 sec shutter, ISO 500 , +1 step exposure bias, 18mm, shutter priority. Two landscapes stitched in Photoshop. Edited in Adobe RAW to enhance colours.This is slightly crooked. Oops.

Canon EOS 50D (Betsy), f/3.5, 1/8000 sec shutter, ISO 500 , +1 step exposure bias, 18mm, shutter priority. Two landscapes stitched in Photoshop. Edited in Adobe RAW to enhance colours.This one will annoy you when you see it. I'm not going to point it out. But it's annoying. Very annoying.

Saturday, June 8, 2013

Under the Sea

I know I have been pretty slack in this blog lately, but let me assure you it is due neither to lack of passion, or too much Dr Who! I have been unable to access the internet much from home lately as we used most of our bandwidth downloading a CyberLink program to edit GoPro footage. It's fun, but time consuming.


Printing on Canvas

There is a lot more to producing high quality photos for a wall than what people realise. When I had an old film camera I never gave the developing process much thought – you gave the chemist your film, paid him, and an hour later ta-da! 24 photos.

I have in the past used Photobookshop.com.au to get myself some photobooks. I even turned my previous blog into a photo book. I like this company because they are fast, high quality bound and Australian. Not to mention the knock out deals you can get when you purchase their vouchers. So when I saw them advertising canvas prints at a discounted rate of 70%. Bargain! I selected four of my favourite landscapes. I bought four vouchers, uploaded my photos and thus began my anxious wait.

They arrived beautifully mounted and a lot larger than I anticipated. However it was soon very clear that the pictures appeared a lot darker than they did on my laptop screen. Colour calibration is not something easily done when sending files to the east coast. Note to self – take more care when preparing files for printing. Where possible, ask for a proof or something. Or have it done locally…20130608_16312520130608_16321520130608_163200

Sunday, May 5, 2013

Karijini the third: Panoramas

I love panoramic photography. I have done since I saw a panoramic picture my Pa took of the Back Beach in Mornington Peninsula - this was five photos placed next to each other and framed, and I just thought it was the coolest thing!

Then of course, as you grow older you soon come to realise the King of panoramic photography is Ken Duncan - Check out my favourite photo of his. Guess where?

To capture so much information, what you are seeing is a huge challenge, especially when it requires photo stitching. I started panoramic photos when I had my first digital camera - a little Kodak. I stitched them together with a free program, Arc Soft, that came with a memory card I purchased.   The results were reasonable, maybe I'll share them with you sometime, but it was clear from the start several techniques and pieces of equipment were required - tripod, a straight horizon and even lighting.

So in our recent journey to Karijini, a place where there are simply too many places to look, I had a stab at a few panoramic images. This is tricky because of the cast of light and shadow in the gorges - exposure is a hard thing to get consistent so most of the successful pieces are actually only two photos stitched together. The ones below are the picks.

Circular Pool - Dales Gorge, Karijini National Park. Canon 50D, f/3.5, 1/200 sec shutter, ISO 250, polarized lens filter, 18mm focal length, four portrait images stitched.
 Circular pool is a fantastic place to swim, and we were blessed with the lighting when we got there - the sun was reflecting off the opposite wall and onto the red rocks behind the pool creating these amazing oranges and reds! I've found with panoramas it's good to take portrait photos instead of landscape. As you can see in the image below, too many landscape photos stitched together and the image becomes quite thin. The image above is four portrait photos, below is three landscape photos.

Karijini National Park, Pilbara. Canon 50D, f/4, 1/4000 sec ISO 250, Exposure bias +2 step, 35mm focal length, three landscape images stitched
The golden hour - as we were driving home from a day of gorging the sun was setting, casting golden light on everything. The golden hour in the Pilbara is pure magic.

Friday, April 19, 2013

Lesson #7: Long Exposures - second & third attempt at star trails

As promised, I attempted a few star trails in my travels over Easter. These suckers are difficult. This is the first time I have found myself wishing for a film camera. Apparently it's easier.

As part of the .com generation, if I don't know something I Google it. Google is a verb, in case you are wondering. According to my extensive research (Wikipedia and photo forums) taking star trails with a bulb setting on a digital camera makes the camera prone to a lot of noise. Coupled with this, the sensor gets hot, creating pixel hot spots - the RGB dots that confused me last time. (A bulb setting is opening the shutter indefinitely to capture movements of light in low light conditions)

The digital technique - the consensus on the Internet was - to take a whole bunch of 30 second exposure shots, one with the foreground lit up, and a complete black one to reduce noise and then stack them in your processing afterwards. This is a long time to wait if you want long star trails, so I only have four attempts to share. I used the stacking method in Photoshop CS4. I was happy with the results, and learnt a number of valuable long exposure star trail tips:

  1. Have a full battery - My battery ran out while attempting this at Karijini. It's OK, I had a spare, but not enough to waste on a shot that 'might work later.'
  2. Have an empty CF card - I did have enough space but only because I shot in JPEG. It also helps to have a good quality card that will write the photo information quickly.
  3. Remotes are gold - This means the shots are taken as close together as possible with as little break in the trail. I set the camera on continuous shooting and just pressed the remote button and left it at that.
  4. Use a warm light when lighting the foreground - I only had an LED torch which as you will see, came out very cold. 
  5. Do this on a still night with no clouds and as little light pollution as possible (including the Moon) - The moon interrupted the Karijini shot, and I got some interesting photos of lightening under stars, but the trails peter out. My final test wast interrupted by clouds, and therefore you can see breaks in the trails.
First attempt at Karijini. Either the tripod wasn't stable or the Image Stabilizer hadn't been turned off on the lens, but the trails are crooked. Plus you can see the light pollution from the Moon.


This is quite cool - I got a shooting star effect! Below the stars is where a fence was, but you can see how over time the moon came up and the stars faded - giving the shooting look.

Demonstrating the cold light of LED torch, as well as the importance of a still (meaning, no wind) night. There were also clouds that broke the trails.
This is the best of the four - taken at an increased focal length, which I think helped the clarity of the trail. Funnily enough the increased focal length was due to the storm in the distance - for lightning photos, see my Facebook page!

Sunday, April 14, 2013

Mysteries of Misty Waters in Karijini

As promised, a second edition on the Karijini expedition. The jury is still out on the third. This trip was surprisingly good for water shots, despite the incredibly bright sun. Once down in the shade of the gorges, and the sun had started to disappear, water shots were so much fun to take. There is something so satisfying about setting up a shot, leaving the shutter open for a few seconds, and eagerly checking the LCD screen to see if the water is misty while the rocks are crystal clear.

Can I just say, I am so glad I do not have a film camera for water shots? Star trails - different story. I learnt so much from shot to shot - composition, timing, reducing camera shake, or in my case, tripod shake. Some of these things you just don't know with film until they are developed!

Once you have the settings done for a particular gorge, you can go from little run of water, to small waterfall, to bigger waterfalls, composing shots and taking misty water photos. I say again, it is so much fun. What would you do down those gorges without a camera I ask you?

The other thing that was really valuable from this trip is the amount I shot in RAW and had to process later. Only then did I realise I had the white balance wrong for a lot of my water shots, and it needed to be corrected in Camera RAW (a lot of my water had an odd blue tinge).

Check out some of my water shots below:


Handrail Pool, Weano Gorge Karijini NP. Canon EOS 50D (Betsy), 1 second shutter, Manual program, f/14, ISO 100, 18mm focal length. Increased contrast, vibrance, saturation in Camera Raw. Also slight warming with magenta tint.
Handrail Pool is a great spot in the park, although it is precarious going down the rail you see to the right, carrying camera gear. It's amazing this shot looks so peaceful, there were backpackers jumping off rocks on the other side! This has got to be my favourite shot of the trip. I know I said that last time about the spider, but you go to Karijini for the gorges, so this trumps a golden orb any day!

I've had people say, why not just Photoshop the rail out of the photo so it all looks natural? Well, one, that would be extremely fiddly and I think difficult (too much like hard work) and two, it's called Handrail Pool for a reason...

Dales Gorge, Karijini NP. Betsy again, with EF-S18-200mm lens set at 50mm. 1/4 sec shutter, f/25. Much the same RAW edits as above - warming and magenta tint, contrast, vibrance and saturation adjustments.
This was quite spectacular. We went down Dales Gorge hoping for some interesting light options at sunset and were rewarded with good conditions for water photos plus some really great golden reflections. I promise you, the gold has nothing to do with Photoshop. This was taken at the top of Fortescue Falls, but I thought, if I call this photo Fortescue Falls everyone is going to look at me like I'm crazy!

Knox Gorge, Karijini. Betsy once more (I only have one!) set at 18mm focal length. F/22, 2 sec shutter. Increased contrast, saturation and vibrance with a magenta tint in Camera RAW.
Just as above, the blue has not much at all to do with Photoshop (it may be slightly enhanced) - Knox Gorge really is blue in parts! This is a good example of smooth running water and gives a good indication of the terrain we were carrying camera gear over! But in all seriousness - blue rocks and purple rocks. Really impressive.

Cascades in Knox Gorge, Karijini. Canon EOS 50D with my Nifty Fifty (EF 50mm f/1.8 II), 0.8 sec shutter, f/22, ISO 100. Contrast, brightness, white balance adjustment as well as vibrance and saturation for two photos before stitching in CS4.
I realised on this trip that while the EF-S18-200mm is a brilliant all rounder lens for traveling, it does not specialise well. It's a pretty good zoom in a tight spot and the wide angle does capture a good landscape, however I do tend to miss out on those crystal clear shots. So I complemented it with my Nifty Fifty - this is literally the cheapest Canon lens you can buy. And I love it. It will take some time to master, but it's F-stop can go all the way up to 1.8. Brilliant. It doesn't give you great depth of field for landscapes usually, but I thought I would try it for some of the water photos in Knox Gorge to try and get increased sharpness. Above is the resulting photo - it's actually a panorama. I learnt to edit these RAW images by processing the first image, setting a preset of the settings so the second is processed exactly the same before stitching together.

You may have noticed a lot of talk about editing in Camera RAW in this post, and the captions on the photos indicate pretty much all my photos are edited slightly. I read once that all digital images usually require at least some tweaking in contrast and brightness. But for some purists, I may need to defend myself. When capturing a RAW image what you are actually doing is capturing a digital negative - that is, all the information collected by your camera's sensor. You then need to process them on the computer and it is not much different to developing a negative (not that I have ever done that - I'm pretty sure there are at least a few more controls...). All I really change is the contrast, brightness, vibrance and saturation. For my Karijini photos I warmed up the white balance and increased the tint to the magenta side for most photos to capture as many colours as possible. I will give you an example of what this does below:

Fortescue Falls, Dales Gorge Karijini. Betsy, at 18mm on tripod, 1/4 second, f/22, ISO 250.
This is the unedited version of this shot. One of the last I took before we headed up to the top of the gorge for the sunset. It is dark and the white balance is incorrect. Below is the processed version.


Same shot, only the colours have been corrected by adjusting the white balance and it's brighter and clearer. You particularly notice it in the water - the water has a slight blue tinge in the first shot, and is white in the second.  Could I have done this with my camera on the day I took the shot by adjusting settings? Good question. I like to think not as it was a custom white balance I set on the computer - I already have my camera set to capture slightly saturated images and as I said before, my 18-200mm lens is great at everything but a master of nothing. With more time and fiddling, I could have set a custom white balance on the camera that day, but when you are standing precariously on wet slippery rocks, with your camera pointing down this waterfall and you have to let it go for a few seconds - you want to make as little adjustments as possible!

As I understand it, it is no different than photographers who used to develop their own negatives and get all arty-farty with contrast and colour. Occasionally I mess with hues and gradients but with digital editing I have come to realise that less really is more.

Saturday, April 13, 2013

Photographer's paradise

Karijini National Park, formerly known as the Hamersley Ranges. If you don't know where it is, frankly, I'm not telling because there were too many people there when we visited at Easter time!

None-the-less, this place is a photographers paradise - despite the constant threat of you falling down a gorge or dropping your camera off a cliff. For those of you who followed my previous blog while we were traveling, you will have seen shots of this place before, and heard a couple of stories about how treacherous but rewarding this place can be! They advertise a five or something days trip out here, just for photographers for, I kid you not, around $3,000. Better to just visit it yourself.

We visited with some friends of ours, camping at Dales Gorge for four nights. Karijini is one of the largest National Parks in Australia, and consists of several subterranean gorges. These are great fun to climb down, swim in and just admire. They are full of colour in the banded rocks and interesting rock formations carved out by water. But the colours, oh the colours, are just sensation. Deep, vibrant reds against clear deep blue skys, with white silhouette of snappy gums. Purple, blue, grey, red rocks are prolific.

Your typical Karijini banded rocks - how mind blowing are those colours? Taken with Betsy and my Nifty Fifty down the bottom of Joffre Gorge. Minor editing in RAW - increased warmth and slight magenta hue to bring out the purple rocks. Increased contrast and brightness


It is very isolated though, so being prepared is crucial. I took two batteries and two CF cards. I used both.

This trip was not what I expected. I went with the full intention of getting great photos of huge, impressive gorges - one in particular down the end of Hancock Gorge, however twas not to be - the sun was so blinking bright! I am convinced that the sun is more concentrated in the Pilbara. There is simply, more of it here. Makes it very difficult to take photos during the day.

As it turned out, I had some success with the water shots (after the sun started making its way to bed), which I will write a separate post about, but also a couple of wildlife shots, shown below.

Taken with Betsy and my 18-200mm lens, focal length 187mm. f/5.6, ISO 250, 1/400 shutter.  Minor adjustments in Camera RAW - contrast, exposure, clarity, vibrance and saturation.
 This shot of the golden orb is, ironically, one of my favorites from the trip. I also snapped one of him sucking a dratted fly dry, however is front legs were slightly out of focus on that one. A good zoom is great for shots like this. I may not have needed to go to Karijini to get a shot like this, but this harps back to lesson one: be prepared for every opportunity!


Betsy and my long lens again - 1/640 sec shutter, f/5.6, focal length 200mm ISO 250. Increased contrast, vibrance and saturation in Photoshop.
 This little guy visited the camp one morning. Unfortunately, I ran out of room on my CF card, so instead of shooting in RAW+S JPEG just shot in LG JPEG. This shot was just a JPEG but still came out ok. Plus, this guy is just way too pretty!


Betsy and long lens - 200mm, 1/2500 shutter, shutter priority program. f/5.6, ISO 250. Slight adjustments in Camera RAW - contrast, brightness, warmth, vibrance, saturation.
 Spinafex pigeon! Back in QLD, these guys are grey and called top knots and are considered quite, well, ordinary. But these guys have terrific colouring and cruise around the rocks and the spinafex - it's quite amazing to see these little guys getting around in such a harsh environment!

Keep an eye out for the second Karijini edition - water.

Thursday, April 4, 2013

Long Exposure - Star Trails

These are photos I have been longing to take, but again been too lazy to go out after dark to find a nice dark spot to test it out.

A recent evening at Settler's Lookout at Cossack has filled me with hope. I was shooting some lightning of in the distance, leaving the shutter open for a few minutes at a time, when I realised to my delight I was also capturing some stars and some tiny trails. Sure, I kept bumping the seat I was resting my camera on, so they were a little blurry, and I need to get to the bottom of the RGB spots of colour that aren't supposed to be there, but hopefully, by the time you are reading this I will have been out to Karijini NP where I will have achieved a clearer image! Watch this space...