One thing I have had to learn when taking photos is how to use my eyes.
Human eyes are the most powerful cameras and such an important piece of equipment for photography. Try as you might, you will never capture an image the way your eye will. You will never see the composition your eye sees, or the colours your eye can identify.
But you can train yourself to use your eyes to know what will work in photography land - when you flatten the scene in front of you to fit your camera screen.
One tip that I have learned is this: to always look behind you. Don't think that just because something is in front of you it is the most interesting thing.
This is normally true for sunsets. But while out at Cliff Springs, running around while five months pregnant, in bare feet, with a storm rolling in and a 4WD track to travel back along I was taking photos of the rain and the clouds, because hey, it happens so rarely. The sun was lighting up the spinafex in front of the dark clouds producing magnificent colours with only a little amount of contrast to deal with. I was happy as larry just snapping away.
While travelling back I turned around and there I saw the eye watching me.
As the clouds were rolling in and being reflected in the waterhole they created a giant eye, staring at me, watching me taking photos of the rain. So I starred back at it, and told my camera to stare at it too.
Showing posts with label composition. Show all posts
Saturday, June 18, 2016
Saturday, September 19, 2015
Balance and Poise
This Understanding Photography book has given me heaps of inspiration. I must admit, I can't actually remember if I took this photo on purpose or if I discovered it while editing my photos. Let's say I took it on purpose, as a good photographer always does I'm sure.
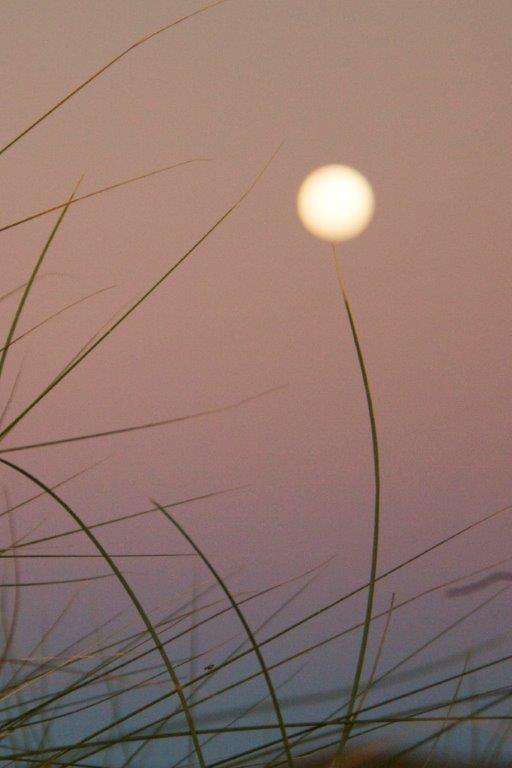
I can't decide if it looks like a lollipop, a balloon, or a moon perfectly positioned to balance on a blade of grass.
It reminds me of the small and insignificant is often aligned with the grand and mighty. One blade of grass, aligned with a body circling the Earth in Space, pulling on our oceans to create tides, and yet here they are together. A matter of perspective. How great is our God who knows not only the blade of grass and the moon in the picture, but the sands I was lying in, the creatures in the water behind me, the stars that are not visible in this photo but are there...just to name a few things.
"Who has measured the waters in the hollow of His hand, And marked off the heavens by the span, And calculated the dust of the earth by the measure, And weighed the mountains in a balance And the hills in a pair of scales?" Isaiah 40:12
I can't decide if it looks like a lollipop, a balloon, or a moon perfectly positioned to balance on a blade of grass.
It reminds me of the small and insignificant is often aligned with the grand and mighty. One blade of grass, aligned with a body circling the Earth in Space, pulling on our oceans to create tides, and yet here they are together. A matter of perspective. How great is our God who knows not only the blade of grass and the moon in the picture, but the sands I was lying in, the creatures in the water behind me, the stars that are not visible in this photo but are there...just to name a few things.
"Who has measured the waters in the hollow of His hand, And marked off the heavens by the span, And calculated the dust of the earth by the measure, And weighed the mountains in a balance And the hills in a pair of scales?" Isaiah 40:12
Sunday, November 23, 2014
The Seascape
Seascapes are beautiful in that they combine the early or late light of sunset or sun rise, with the dependency of coastal rocks, and the fluidity of the waves crashing into them. They are stunning.
While camping at Warroora I had the perfect opportunity to capture my first seascape. In honesty, this is my second attempt - the first ended in zero results but a lot of lessons. The first of those being not pointing the camera directly into the sunset (sunrise is too early for me) - the light overexposes when the shutter is left open to create the mist. I suppose this would be easier on the east coast where the sun sets away from the water. But here on the west we are left with the conundrum of trying to have the light to our back or to the side to light the rocks but not overexpose the centre.
The first attempt at Maggies didn't feel like it went well - however I was pleasantly surprised by my photos when I returned. I liked the ones I took on the first night more than the ones on the second. The second I sought high ground on the rocks to avoid having to rescue my camera and tripod from freak waves - based on experience!
While camping at Warroora I had the perfect opportunity to capture my first seascape. In honesty, this is my second attempt - the first ended in zero results but a lot of lessons. The first of those being not pointing the camera directly into the sunset (sunrise is too early for me) - the light overexposes when the shutter is left open to create the mist. I suppose this would be easier on the east coast where the sun sets away from the water. But here on the west we are left with the conundrum of trying to have the light to our back or to the side to light the rocks but not overexpose the centre.
The first attempt at Maggies didn't feel like it went well - however I was pleasantly surprised by my photos when I returned. I liked the ones I took on the first night more than the ones on the second. The second I sought high ground on the rocks to avoid having to rescue my camera and tripod from freak waves - based on experience!
![]() |
| I like the mist in this once, but the noise due to the low light is a problem. Canon EOS 50D f/22, 20 seconds, ISO 200, 19mm |
Sunday, October 19, 2014
The Milky Way
"The universe is big. It's vase and complicated, and ridiculous and sometimes, very rarely, impossible things just happen and we call them miracles."
Yes. That was a Doctor Who quote. Don't look at me like that, you all knew it was coming!
My first attempt at photographing the Milky Way Galaxy. I must admit I am surprised. I researched somewhat on how to take these photographs, and stumbled across, among others, this article. It had some good advice, including the "500 Rule", equipment and post processing.
What became clear to me even before I started was that my gear was most likely going to be inadequate for any super duper shots. All the articles I saw said you needed a fast lens to avoid too much noise due to the high ISO value. My fastest lens is my nifty-fifty - so not much help in capturing the whole milky way! My wide angle is only f/3.5-4.5. My nifty fifty is f/1.8. It really made a difference.
This was still a fantastic exercise though. I went in with low expectations, thinking I wasn't going to be able to capture the milky way at all, that it would be cloudy, or I would forget something. We were driving through the Pilbara at night, me anxiously looking to see where the milky way would be and lo and behold, we pull over to camp and here it is, smack bang in front of me! We were able to set up the chairs, my husband patiently sat there watching me after setting up the swag, and I started snapping as soon as the lights were out! I managed to capture the milky way on the first shot. The foreground, not so much but the milky way yes!
The foreground proved to be my most tricky thing. The milky way was easy, because I knew my shots were going to be grainy and there was little I could do about it, given the gear I had. The foreground wasn't playing the game though. Vegetation was blowing in the wind, my flash wasn't making it over the lens and I had left my external flash at home. I ended up light painting with my headlamp, which all in all was an acceptable solution.
The above is probably the best shot of the milky way I got. You can see how it was windy in the vegetation below, but I like the angle of the milky way. You can see I stopped down the ISO to 1600 because 3200 was just far to grainy. This one is still too grainy to do anything useful with, but still, a lot of fun.
Like I said, I tried all my lenses, especially my nifty fifty because it was the fastest. I could boost the ISO to 3200 for this one, still grainy but not too bad. Composition was a challenge though, because I couldn't actually see through the viewfinder, or even in the live view if I was focusing on the galaxy or not. So there was a lot of maneuvering and guess work involved.
It is incredible that even with a slow lens, my camera can pick up so many stars. What's even more incredible is that their creator knows them all by name.
Isaiah 40:26 - 28. Lift up your eyes on high and see: who created these? He who brings out their host by number, calling them all by name, by the greatness of his might, and because he is strong in power not one is missing. Why do you say, O Jacob and speak, O Israel, "My way is hidden from the LORD and my right is disregarded by my God"? The LORD is the everlasting God, the creator of the ends of the earth. He does not faint or grow weary, his understanding is unsearchable.
Yes. That was a Doctor Who quote. Don't look at me like that, you all knew it was coming!
My first attempt at photographing the Milky Way Galaxy. I must admit I am surprised. I researched somewhat on how to take these photographs, and stumbled across, among others, this article. It had some good advice, including the "500 Rule", equipment and post processing.
What became clear to me even before I started was that my gear was most likely going to be inadequate for any super duper shots. All the articles I saw said you needed a fast lens to avoid too much noise due to the high ISO value. My fastest lens is my nifty-fifty - so not much help in capturing the whole milky way! My wide angle is only f/3.5-4.5. My nifty fifty is f/1.8. It really made a difference.
This was still a fantastic exercise though. I went in with low expectations, thinking I wasn't going to be able to capture the milky way at all, that it would be cloudy, or I would forget something. We were driving through the Pilbara at night, me anxiously looking to see where the milky way would be and lo and behold, we pull over to camp and here it is, smack bang in front of me! We were able to set up the chairs, my husband patiently sat there watching me after setting up the swag, and I started snapping as soon as the lights were out! I managed to capture the milky way on the first shot. The foreground, not so much but the milky way yes!
The foreground proved to be my most tricky thing. The milky way was easy, because I knew my shots were going to be grainy and there was little I could do about it, given the gear I had. The foreground wasn't playing the game though. Vegetation was blowing in the wind, my flash wasn't making it over the lens and I had left my external flash at home. I ended up light painting with my headlamp, which all in all was an acceptable solution.
![]() |
| Canon 50D, f/3.5, ISO 1600, 30 seconds, 10mm. 10-22mm Wide angle lens (Canon), light painting in the foreground |
Like I said, I tried all my lenses, especially my nifty fifty because it was the fastest. I could boost the ISO to 3200 for this one, still grainy but not too bad. Composition was a challenge though, because I couldn't actually see through the viewfinder, or even in the live view if I was focusing on the galaxy or not. So there was a lot of maneuvering and guess work involved.
![]() |
| Canon EOS 50D f/1.8, 6 seconds, ISO 3200, 50mm (nifty fifty), |
Isaiah 40:26 - 28. Lift up your eyes on high and see: who created these? He who brings out their host by number, calling them all by name, by the greatness of his might, and because he is strong in power not one is missing. Why do you say, O Jacob and speak, O Israel, "My way is hidden from the LORD and my right is disregarded by my God"? The LORD is the everlasting God, the creator of the ends of the earth. He does not faint or grow weary, his understanding is unsearchable.
Saturday, August 30, 2014
Macro Bucket List
Upon purchasing a macro lens, there are a number of things I have wanted to take a photo of - predominantly insects and other creepy crawlies. The top of the creepy crawly list was a bee. At Gregories Gorge, I had that opportunity. Small amount of wind, bright sun and a hungry bee made for one happy shutterbug!
This image is cropped and edited in Photoshop, but I must say I do like the composition. I had to keep trimming before I was 100% happy, it was a rather awkward one as there were continually highlights on the edges, but when removed the bee wasn't prominent. As it is he is a little stuck in the corner. It helps that purple and green is my favourite colour combination at the moment. This is the best angle of the bee that I captured. Not perfectly ideal, but not bad for a first attempt I would say!
![]() |
| Canon EOS 50D, f/5, 1/500, ISO 100, 100mm Macro |
Thursday, March 13, 2014
Composing the Towers
Having an hour at the lakeside of the three towers of Torres Del Paine was a great chance to scamper around and try and get the best shot. I have never before been so thankful for my polarizing filter that made the sky blue and the lake so green! But good composition for landscape requires interest in the foreground. This proved quite a challenge on the slopes of a moraine looking over a lake!
To clarify - 50 years ago the green lake was not there it was in fact a glacier. You can see what remains of the glacier below the towers. The slope we were on and that you can see to the left and right is what is called a moraine - rocks and debris that were pushed up by the glacier when it existed, and now it has retreated it has left the moraine in tact, and a glacial lake that is coloured by the minerals from the glacial water.
I like this photo because it inspired me to get a wide angle lens. It is a stitched panorama of three photos. I like the foreground with the rocks, leading your eye into the lake and up the towers. It is a pity the mist decided to cross at that precise moment, but otherwise I am happy with this composition.
I must admit this is another favourite. Maybe not as well composed as the first, the colours are what grab me in this one. With a polarizing filter and enough clear sky for that blue to contrast with the towers. Magnifique! I have this on a canvas on the wall. For me colour beats composition and even this composition is not bad. It almost fits the rule of thirds, kind of has a leading line in the lake...getting there.
Finally, an alternative. I found myself taking a lot of portrait landscapes. I don't know if it is Pinterest influence or what, but I quite like a portrait landscape. This one is quite good with the rocks in the foreground, although the rock is a little too soft. I haven't quite mastered the depth of field thing yet. One thing at a time.
To clarify - 50 years ago the green lake was not there it was in fact a glacier. You can see what remains of the glacier below the towers. The slope we were on and that you can see to the left and right is what is called a moraine - rocks and debris that were pushed up by the glacier when it existed, and now it has retreated it has left the moraine in tact, and a glacial lake that is coloured by the minerals from the glacial water.
![]() |
| Panorama - portrait shots stitched together. Canon EOS 50D f/9, 1/320, ISO 200, 18mm |
![]() |
| Canon EOS 50D f/9, 1/400 ISO 200 18mm. Polarizing filter. |
![]() |
| Canon EOS 50D f/9, 1/400, ISO 200, 18mm. Polorazing filter |
Wednesday, March 12, 2014
Why go to Torres Del Paine?
Torres Del Paine is beautiful but it is right down in the Antartic region of South America. Why go there and hike for seven days? What is the main attraction?
The main attraction are the towers - the three towers above the green lake. They are a stunning sight to see. Of course, just to get there is a 22km return hike up and down a mountain but it is well worth it. We had about an hour at the lakeside to have lunch and take photos on our last hiking day. (so did hundreds of other people...don't even get me started on the French family that managed to photo bomb nearly every person's photo. At least there were limited camera nerds). Below is my favourite photo from that adventure. It is a vertical panorama - three landscape photos stacked on top of each other. I tried putting it on a canvas but the size was just a little too tight. It belongs to a post of its own though. Tomorrow, I will share the composition challenges I had in this place, but for now, enjoy my favourite tower photo!
It's not very imaginative, but I love the colours. The green in the lake, the grey, the white, and the yellow and orange that top the towers. We were lucky enough to have limited mist as well - just enough to make the shot interesting!
The main attraction are the towers - the three towers above the green lake. They are a stunning sight to see. Of course, just to get there is a 22km return hike up and down a mountain but it is well worth it. We had about an hour at the lakeside to have lunch and take photos on our last hiking day. (so did hundreds of other people...don't even get me started on the French family that managed to photo bomb nearly every person's photo. At least there were limited camera nerds). Below is my favourite photo from that adventure. It is a vertical panorama - three landscape photos stacked on top of each other. I tried putting it on a canvas but the size was just a little too tight. It belongs to a post of its own though. Tomorrow, I will share the composition challenges I had in this place, but for now, enjoy my favourite tower photo!
![]() |
| Canon EOS 50D f/9, 1/400, 50mm |
Saturday, February 1, 2014
Architecture Composition Challenge
I've never really been one for taking photos of buildings. I think they are beautiful, but the beautiful kind are rather in short supply in the Pilbara. (I'm sorry but it's true! Modern architecture does nothing for me, I find it depressingly dull).
Now, I know absolutely nothing about architecture. Or building, or in fact, design of buildings. But I know when I see one that's beautiful. It doesn't even have to be functional! Just beautiful.
I also know that they are kind of hard to take photos of, especially at close range. In my own typical fashion I did no research on composition before going to South America and decided instead to just wing it, as you do. Some were good, some not so good, some were OK once they had been through the editing process.
See, when looking through a lens on a building at close range, the straight lines become skewed out of proportion. I have read tutorials on how to correct this in Photoshop (making parallel lines actually appear parallel and so on) but it's quite difficult to apply to your own photos. I've found myself thinking back to 'did it actually look like that?' several times. The horizon straitening tool in Adobe RAW came in very handy for these images.
Another thing I didn't notice until I was going through my photos post-trip is that I took an extraordinarily large number of photos in the portrait orientation. For some reason, I found this easier to compose than landscape. When taking photos of buildings it is good to have parallel lines and seeing as buildings go up, the photo goes up as well. I also found it was good to incorporate a building corner and try to have something in the foreground.
I should write down composition as a goal for 2014 - it has never really been my strong point, I've always just sort of pointed and shot what I thought looked good and hoped for the best.
We were surprised at the level of Spanish influence throughout South America. As we have never been to Europe, we felt like we were in Europe. Beautiful oil paintings, old buildings, cathedrals. In Cusco it was interesting because Cusco being the ancient Inca capital, was torn down by the Spanish who then proceeded to build the city on the same site with Spanish architecture and local rock and labour. Classic example is below.
This church actually made me feel funny. I know that's not a very eloquent sentence but it was true. Peru in general made me a little uncomfortable, particularly Cusco. Let me explain - a warning, this is going to get a little less light-hearted and a little more serious. The dark rocks in the above photograph are what remains of the Inca site Inti Kancha or the Inca Temple of the Sun. It was demolished by the Spaniards and replaced with a Cathedral dedicated to Santo Domingo. Inside the Cathedral are beautiful carvings covered with gold filigree, statues of Christ, intricate alters, paintings and other beautiful works of art. Our tour guide told us a story of one of the statues of Christ, who had been blackened by the candles (apparently) and how the Peruvian people worshiped him as Lord of the Earthquakes because of an incident when an earthquake stopped once the statue was brought outside. I couldn't help but think, 'this isn't the Christ I know.' This was the only recognition I saw in that country of any kind of belief in Christ, the rest of the church was dead. Spiritually dead. And so much money just sitting there in the gold with people begging on the streets. All for what? A God that the local people didn't believe in? Wouldn't God want that money to be used to build up those people, to bring healing? It was then that I realised that Christianity truly is a grassroots movement and cannot, CANNOT be implemented by any Government decree, by force, or by invasion. It doesn't work. On top of this, the cathedral was built on the foundations of the most sacred site to the Incas, the Temple of the Sun. A site considered more sacred to the local people than the church itself, a site that is better constructed than the church itself (the church fell down in the above mentioned earthquake, the temple of the sun did not). It made me sad, that the builders on this church would even associate Christ with any Inca beliefs, and would appear to try and just replace their beliefs and secondly, it was so empty! It was a museum, not used except at Easter time. It was very saddening and had a very profound impact on me as I walked through that place, it made my heart cry out for these people.
Moving on from Cusco, we visited Arequipa. Arequipa is the economic hub of Peru, it is shadowed by volcanoes and is built with white volcanic stone. It is rather an impressive city. While we were there there was some kind of rally going on at the town centre (the Spanish loved their central plazas!) so I didn't take my SLR out much. We did visit St Catalina Monastery. This was incredibly interesting. It was one of the richest monasteries in the world and has now been opened up as a tourist site. Nuns still live there, only not in the tourist section, in another section. They are not allowed to live in luxury anymore and hence, the number of nuns has dwindled. Still it was a fascinating place to visit! It is probably the place I had the most fun snapping away at the buildings as they were really interesting colours.
Now, I know absolutely nothing about architecture. Or building, or in fact, design of buildings. But I know when I see one that's beautiful. It doesn't even have to be functional! Just beautiful.
I also know that they are kind of hard to take photos of, especially at close range. In my own typical fashion I did no research on composition before going to South America and decided instead to just wing it, as you do. Some were good, some not so good, some were OK once they had been through the editing process.
See, when looking through a lens on a building at close range, the straight lines become skewed out of proportion. I have read tutorials on how to correct this in Photoshop (making parallel lines actually appear parallel and so on) but it's quite difficult to apply to your own photos. I've found myself thinking back to 'did it actually look like that?' several times. The horizon straitening tool in Adobe RAW came in very handy for these images.
Another thing I didn't notice until I was going through my photos post-trip is that I took an extraordinarily large number of photos in the portrait orientation. For some reason, I found this easier to compose than landscape. When taking photos of buildings it is good to have parallel lines and seeing as buildings go up, the photo goes up as well. I also found it was good to incorporate a building corner and try to have something in the foreground.
I should write down composition as a goal for 2014 - it has never really been my strong point, I've always just sort of pointed and shot what I thought looked good and hoped for the best.
![]() |
| Museum in Cusco. Classic Spanish inspiration. Love the plants as well. Canon EOS 50D f/8, 1/640 ISO 320 |
![]() |
| Quikancha (Temple of the Sun) and the Church of Santo Domingo. Canon EOS 50D f/8, 1/250, ISO 320, 18mm. |
Moving on from Cusco, we visited Arequipa. Arequipa is the economic hub of Peru, it is shadowed by volcanoes and is built with white volcanic stone. It is rather an impressive city. While we were there there was some kind of rally going on at the town centre (the Spanish loved their central plazas!) so I didn't take my SLR out much. We did visit St Catalina Monastery. This was incredibly interesting. It was one of the richest monasteries in the world and has now been opened up as a tourist site. Nuns still live there, only not in the tourist section, in another section. They are not allowed to live in luxury anymore and hence, the number of nuns has dwindled. Still it was a fascinating place to visit! It is probably the place I had the most fun snapping away at the buildings as they were really interesting colours.
![]() |
| Canon EOS 50D f/5, 1/250, ISO 500, 18mm |
![]() |
| Canon EOS 50D 1/640, ISO 500, 18mm |
![]() |
| Canon EOS 50D f/4.5 1/125 ISO 500, 24 mm |
![]() |
| Canon EOS 50D f/6.3, 1/1000, ISO 500, 18mm |
Monday, November 18, 2013
Landscape at 140mm
Growing up in South East Queensland I never realised how precious that paradise was. I never realised what a rare commodity the rainforest was, nor how much mountains (even small ones) can affect the weather, or valued being able to walk barefoot on green grass.
On recent visit to Bribie Island, just north of Brisbane, we spent some time on the beach of the passage between the island and the mainland. It was a beautiful day, clear as a bell. You could see the Glass House Mountains in the Sunshine Coast Hinterland across the passage in a blue haze. So very blue.
Of course, they were quite a way a ways, therefore the trusty 18-200mm was zoomed in to a 140mm focal length. Not your typical landscape focal length, but I was pretty pleased with the results. I have cropped this image to be a panoramic size, and tweaked the colours slightly in Photoshop and added a post-crop vignette.
Of course, it has dawned on me that as I write this, I am sitting in my lounge at 9:20pm watching British comedy. I can multi-task. (I said the same thing about my homework in high school). But as you are reading this I will be in some real mountains. Big mountains. Called the Andes - hiking up to Maccu Pichu in Peru to be exact. Hopefully safe. Hopefully this is a self-fulling prophesy - we are having an amazing time and sometime in 2014 you will be seeing some South America pictures on this blog! God willing my camera and memory cards are not stolen. And I am not killed in a terrifying plane crash. OK, it's 9:30 and the paranoia is creeping in so I had better sign off. Hope you like the Glass House Mountains and I look forward to sharing the Andes with you in good time.
On recent visit to Bribie Island, just north of Brisbane, we spent some time on the beach of the passage between the island and the mainland. It was a beautiful day, clear as a bell. You could see the Glass House Mountains in the Sunshine Coast Hinterland across the passage in a blue haze. So very blue.
Of course, they were quite a way a ways, therefore the trusty 18-200mm was zoomed in to a 140mm focal length. Not your typical landscape focal length, but I was pretty pleased with the results. I have cropped this image to be a panoramic size, and tweaked the colours slightly in Photoshop and added a post-crop vignette.
![]() |
| Glass House Mountains. Canon EOS 50D f/5.6 1/2000 shutter, ISO 160, +2 step exposure bias, 140mm. |
Saturday, November 9, 2013
Ozzie Snappy Gums
That photo was not blog worthy, in case you were wondering.
There are a lot of them up here though, and they present a rather artistic challenge: how do you take a photo of a twisted tree? Composition is probably one of my weaker points as a photographer (which is kind of an issue) and particularly with trees. I always think they just look so cool, and then I get home to go through my photos and feel let down. Here is just one example.
![]() |
| Betsy, f/7.1, 1/640, 18mm, ISO 500. |
![]() |
| Betsy, f/7.1, 1/400, ISO 500, 200mm, cropped, Edited in Adobe RAW |
Monday, September 30, 2013
Wildflowers Post-Script: More Mulla Mulla
Mulla Mulla are by far the most prolific wildflower in the Pilbara, and it would be a tight coin toss as to who would win a most-photographed flower here between them and the Desert Pea. Mulla Mulla photos are a dime a dozen - from the top, from the bottom, from the side, in bunches, on their own, against the sky, against the ground...the list goes on.
But just as a little appendix to my September of Pilbara wildflowers I thought I would share with you my first Mulla Mulla photo against the sky. This particular variety does not have as green leaves or stems, begins to lose its purple from the bottom and has more accented purple spikes. I think they are pretty spectacular.
Until next year I bid the wildflowers adieu! Although I make no guarantees that they won't appear on this blog between now and then, they are simply too colourful!
Saturday, August 24, 2013
Lesson #8 & #9: The remote, the lens and explosions of colour
There are few moments in life where one can sit back and do absolutely nothing and be entertained completely at the expense of others. I am of course speaking literally here – sitting back at a show that has free entrance, watching a fireworks display. I shudder to think how much money these explosions of colour cost, but my goodness are they fun to watch! They are also particularly fun to photograph, as I found out a few weeks ago.
I have had grand intentions of photographing fireworks in the past with zero success – this year is the first opportunity I have fully taken advantage of. I packed my Betsy, my tripod and by the grace of God, my remote.
We set up in amidst throngs of people underneath huge oval spotlights that I confess, had me worried. I set my camera at a 30 second shutter speed, wide aperture and waited for the show.
The lights dimmed, the first spark went up and it was on.
After three explosions it became clear that 30 seconds was going to be way too long. I set it back to 6 seconds. Again, too long. Some fireworks were clearly brighter than others. A single setting for all was not going to work, and I didn’t want to waste time changing settings, especially when you have no idea what is about to explode overhead! How to fix this? Light bulb moment – almost literally – BULB!
Enter lesson eight: With my remote and the shutter set to Bulb I could press and release as I pleased depending on how bright each blast was. I had to adjust the aperture several times, but towards the end managed to get the hang of the timing of the show and came out with some crackers. The best part? I was able to sit back in my comfy camp chair, watch the show and just press and release my remote! Honestly, most enjoyable way to photograph something! It became an awesomely fun challenge to get the timing right.
Of course, each silver lining comes with a dark cloud. The day before this glorious revelation we had been at the beach. Enter lesson nine: Clean lens after taking Betsy to the beach! Due to some salt spray on my lens, many of my firework photos were rendered useless! Luckily some were not bright enough to make the salt spots shine, so there are a number of usable ones.
Not bad for a first time photographing fireworks though! It may not be natural creation, but they are still a creation of colours, and a whole lot of fun!
Just a note that all these images are edit free other than cropping. I needed the full 18mm to capture the whole diameter but it left a lot of dark space that required cropping. Not to mention the salt spots!
I have had grand intentions of photographing fireworks in the past with zero success – this year is the first opportunity I have fully taken advantage of. I packed my Betsy, my tripod and by the grace of God, my remote.
We set up in amidst throngs of people underneath huge oval spotlights that I confess, had me worried. I set my camera at a 30 second shutter speed, wide aperture and waited for the show.
The lights dimmed, the first spark went up and it was on.
After three explosions it became clear that 30 seconds was going to be way too long. I set it back to 6 seconds. Again, too long. Some fireworks were clearly brighter than others. A single setting for all was not going to work, and I didn’t want to waste time changing settings, especially when you have no idea what is about to explode overhead! How to fix this? Light bulb moment – almost literally – BULB!
Enter lesson eight: With my remote and the shutter set to Bulb I could press and release as I pleased depending on how bright each blast was. I had to adjust the aperture several times, but towards the end managed to get the hang of the timing of the show and came out with some crackers. The best part? I was able to sit back in my comfy camp chair, watch the show and just press and release my remote! Honestly, most enjoyable way to photograph something! It became an awesomely fun challenge to get the timing right.
Of course, each silver lining comes with a dark cloud. The day before this glorious revelation we had been at the beach. Enter lesson nine: Clean lens after taking Betsy to the beach! Due to some salt spray on my lens, many of my firework photos were rendered useless! Luckily some were not bright enough to make the salt spots shine, so there are a number of usable ones.
![]() |
| Two different types here, great patterns. Small salt spots on the bottom though which is a shame. EOS 50D, f/16, 6 seconds, 18mm. |
![]() |
| These guys were interesting. When you watch them they appear as dots of light. When photographed they appear as feathers. It's so much fun. EOS 50D f/22 ISO 500 18mm. |
![]() |
| The difference the shutter speed makes - same style as two above, but this time the shutter is only 1 second. EOS 50D, f/22, ISO 500 18mm. I think it looks like a protia flower. |
![]() |
| Blue seemed to work well as it was not bright enough to light up the salt spots. Plus there were no fireworks underneath this one which helped. EOS 50D f/22 2 seconds, ISO500 18mm |
![]() |
| Probably my favourite because of the different colours and the glitter effect of the gold. Canon EOS 50D, f/22, 2 seconds, ISO 500, 18mm |
Not bad for a first time photographing fireworks though! It may not be natural creation, but they are still a creation of colours, and a whole lot of fun!
Just a note that all these images are edit free other than cropping. I needed the full 18mm to capture the whole diameter but it left a lot of dark space that required cropping. Not to mention the salt spots!
Labels:
#8,
#9,
beginner,
Betsy,
camera maintenance,
capture the moment,
colours,
composition,
cropped,
edit free,
experiment,
fireworks,
first attempt,
Karratha,
lesson,
long exposure,
remote,
shutter speed
Wednesday, August 21, 2013
The Beautiful Desert Rose
One thing that I have always admired about creation is the decorative colours flowers provide. I may be a shocker when it comes to naming a species, but when it comes to admiration, I have it in bucket-loads.
Western Australia is famous for its flowers – this is a well established fact. Not many people think of the Pilbara when it comes to flowers though. The truth is that there are numerous vibrant examples of unique and wonderful natural decorations up here. Some are cultivated but most grow like there is no tomorrow a couple of months after rain.
I may produce another post dedicated to the Pilbara wildflowers, however this one I just want to focus on one flower that is common in pots and gardens up here – the desert rose. I have one, that hasn’t flowered yet, but they are prolific in town green-space and facilities as well as private gardens and they are stunning splashes of pink against strong green with a hardy stem.
I photographed one at a small museum last weekend, and was once again quite amazed at the difference editing the RAW file made. Colours are vibrant and the clarity better. Your can adjust the white balance to ensure maximum impact of colour. The image below was considerably more red in the original. Increased contrast and tweaking the tint to make the image warmer with a slight magenta hue worked wonders.
Western Australia is famous for its flowers – this is a well established fact. Not many people think of the Pilbara when it comes to flowers though. The truth is that there are numerous vibrant examples of unique and wonderful natural decorations up here. Some are cultivated but most grow like there is no tomorrow a couple of months after rain.
I may produce another post dedicated to the Pilbara wildflowers, however this one I just want to focus on one flower that is common in pots and gardens up here – the desert rose. I have one, that hasn’t flowered yet, but they are prolific in town green-space and facilities as well as private gardens and they are stunning splashes of pink against strong green with a hardy stem.
I photographed one at a small museum last weekend, and was once again quite amazed at the difference editing the RAW file made. Colours are vibrant and the clarity better. Your can adjust the white balance to ensure maximum impact of colour. The image below was considerably more red in the original. Increased contrast and tweaking the tint to make the image warmer with a slight magenta hue worked wonders.
![]() |
| Canon EOS 50D f/5.6 1/8000 shutter, ISO 500, -1.3 step exposure bias. 70mm. Colour adjustment in Adobe RAW |
Labels:
colours,
composition,
flowers,
native,
Pilbara,
RAW,
WA,
white balance,
wildflowers,
zoom
Saturday, August 17, 2013
The Original Kodak Moment
Remember what I said about not taking photos of anything that moves? Well, sometimes life presents an event that you either say “I wish I had my camera in the car right now!” or “I’ve got to do anything to I can to get a photo – the opportunity is too great!” I call it the Original Kodak Moment. Or making your own luck. Or putting yourself in silly situations just for a photo.
One such moment presented itself on the weekend.
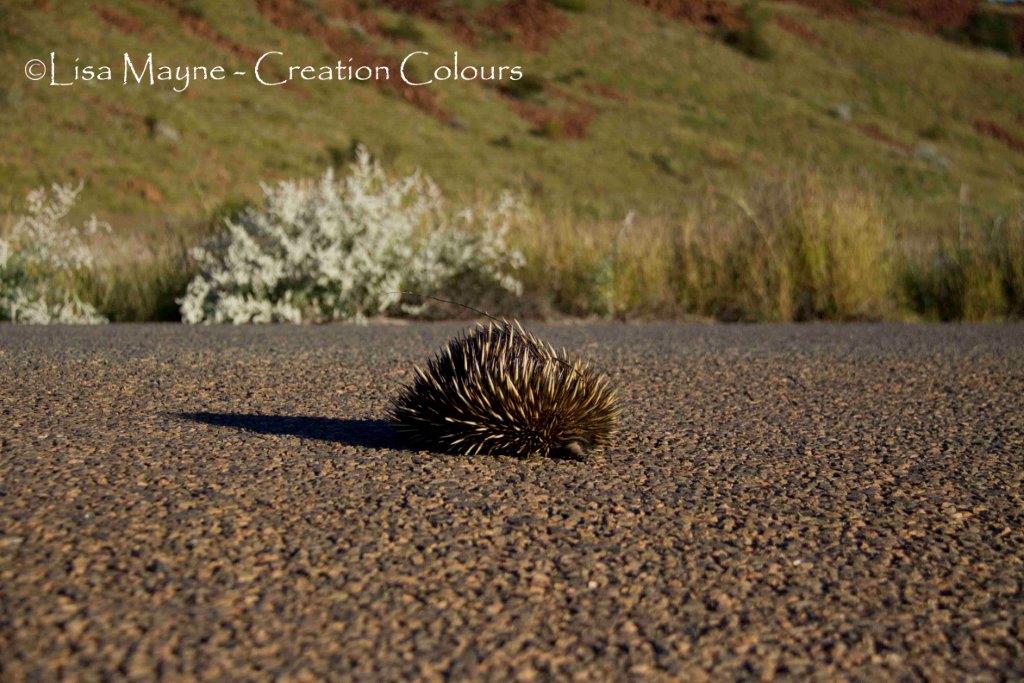
I was driving my little car along an outback road, when suddenly my tires nearly burst thanks to the little guy below running out onto the street! I slowed down, the guy coming the other way stopped, and I raced out with my camera, and my grandmother’s camera who was visiting at the time. Of course, I wasn’t first to the scene of the terrified echidna, but I think my Betsy managed to intimidate the other onlookers a little…oops, that’s really not meant to happen!
So here I am, crouched down on a road where the speed limit is about 80km an hour. It’s a popular road on a weekend as it leads to a nice little cove. Two cars had to swerve to the other side of the road to miss me. I’m sure they thought I was quite mad but let’s face it: you don’t want to hit one of these guys with your car!
Normally I would remove such a gorgeous creature out of the way on my departure (generally by chasing it, yes) but to tell you the truth I was a little intimidated by those spikes! When left alone however, he quickly scampered off into the bush so no harm done. Well other than the fright of its life!
At the end of the day, if it moves it’s difficult, but if it refuses to move out of shear fright it’s fair game!
One such moment presented itself on the weekend.
I was driving my little car along an outback road, when suddenly my tires nearly burst thanks to the little guy below running out onto the street! I slowed down, the guy coming the other way stopped, and I raced out with my camera, and my grandmother’s camera who was visiting at the time. Of course, I wasn’t first to the scene of the terrified echidna, but I think my Betsy managed to intimidate the other onlookers a little…oops, that’s really not meant to happen!
So here I am, crouched down on a road where the speed limit is about 80km an hour. It’s a popular road on a weekend as it leads to a nice little cove. Two cars had to swerve to the other side of the road to miss me. I’m sure they thought I was quite mad but let’s face it: you don’t want to hit one of these guys with your car!
Normally I would remove such a gorgeous creature out of the way on my departure (generally by chasing it, yes) but to tell you the truth I was a little intimidated by those spikes! When left alone however, he quickly scampered off into the bush so no harm done. Well other than the fright of its life!
At the end of the day, if it moves it’s difficult, but if it refuses to move out of shear fright it’s fair game!
Labels:
amazing creature,
animal photography,
Betsy,
capture the moment,
colours,
composition,
echidna,
interruption,
native animals,
original kodak moment,
Pilbara road,
precarious situation,
WA,
wildlife,
zoom
Sunday, April 14, 2013
Mysteries of Misty Waters in Karijini
As promised, a second edition on the Karijini expedition. The jury is still out on the third. This trip was surprisingly good for water shots, despite the incredibly bright sun. Once down in the shade of the gorges, and the sun had started to disappear, water shots were so much fun to take. There is something so satisfying about setting up a shot, leaving the shutter open for a few seconds, and eagerly checking the LCD screen to see if the water is misty while the rocks are crystal clear.
Can I just say, I am so glad I do not have a film camera for water shots? Star trails - different story. I learnt so much from shot to shot - composition, timing, reducing camera shake, or in my case, tripod shake. Some of these things you just don't know with film until they are developed!
Once you have the settings done for a particular gorge, you can go from little run of water, to small waterfall, to bigger waterfalls, composing shots and taking misty water photos. I say again, it is so much fun. What would you do down those gorges without a camera I ask you?
The other thing that was really valuable from this trip is the amount I shot in RAW and had to process later. Only then did I realise I had the white balance wrong for a lot of my water shots, and it needed to be corrected in Camera RAW (a lot of my water had an odd blue tinge).
Check out some of my water shots below:
I've had people say, why not just Photoshop the rail out of the photo so it all looks natural? Well, one, that would be extremely fiddly and I think difficult (too much like hard work) and two, it's called Handrail Pool for a reason...
Just as above, the blue has not much at all to do with Photoshop (it may be slightly enhanced) - Knox Gorge really is blue in parts! This is a good example of smooth running water and gives a good indication of the terrain we were carrying camera gear over! But in all seriousness - blue rocks and purple rocks. Really impressive.
You may have noticed a lot of talk about editing in Camera RAW in this post, and the captions on the photos indicate pretty much all my photos are edited slightly. I read once that all digital images usually require at least some tweaking in contrast and brightness. But for some purists, I may need to defend myself. When capturing a RAW image what you are actually doing is capturing a digital negative - that is, all the information collected by your camera's sensor. You then need to process them on the computer and it is not much different to developing a negative (not that I have ever done that - I'm pretty sure there are at least a few more controls...). All I really change is the contrast, brightness, vibrance and saturation. For my Karijini photos I warmed up the white balance and increased the tint to the magenta side for most photos to capture as many colours as possible. I will give you an example of what this does below:
This is the unedited version of this shot. One of the last I took before we headed up to the top of the gorge for the sunset. It is dark and the white balance is incorrect. Below is the processed version.
Same shot, only the colours have been corrected by adjusting the white balance and it's brighter and clearer. You particularly notice it in the water - the water has a slight blue tinge in the first shot, and is white in the second. Could I have done this with my camera on the day I took the shot by adjusting settings? Good question. I like to think not as it was a custom white balance I set on the computer - I already have my camera set to capture slightly saturated images and as I said before, my 18-200mm lens is great at everything but a master of nothing. With more time and fiddling, I could have set a custom white balance on the camera that day, but when you are standing precariously on wet slippery rocks, with your camera pointing down this waterfall and you have to let it go for a few seconds - you want to make as little adjustments as possible!
As I understand it, it is no different than photographers who used to develop their own negatives and get all arty-farty with contrast and colour. Occasionally I mess with hues and gradients but with digital editing I have come to realise that less really is more.
Can I just say, I am so glad I do not have a film camera for water shots? Star trails - different story. I learnt so much from shot to shot - composition, timing, reducing camera shake, or in my case, tripod shake. Some of these things you just don't know with film until they are developed!
Once you have the settings done for a particular gorge, you can go from little run of water, to small waterfall, to bigger waterfalls, composing shots and taking misty water photos. I say again, it is so much fun. What would you do down those gorges without a camera I ask you?
The other thing that was really valuable from this trip is the amount I shot in RAW and had to process later. Only then did I realise I had the white balance wrong for a lot of my water shots, and it needed to be corrected in Camera RAW (a lot of my water had an odd blue tinge).
Check out some of my water shots below:
I've had people say, why not just Photoshop the rail out of the photo so it all looks natural? Well, one, that would be extremely fiddly and I think difficult (too much like hard work) and two, it's called Handrail Pool for a reason...
![]() |
| Knox Gorge, Karijini. Betsy once more (I only have one!) set at 18mm focal length. F/22, 2 sec shutter. Increased contrast, saturation and vibrance with a magenta tint in Camera RAW. |
You may have noticed a lot of talk about editing in Camera RAW in this post, and the captions on the photos indicate pretty much all my photos are edited slightly. I read once that all digital images usually require at least some tweaking in contrast and brightness. But for some purists, I may need to defend myself. When capturing a RAW image what you are actually doing is capturing a digital negative - that is, all the information collected by your camera's sensor. You then need to process them on the computer and it is not much different to developing a negative (not that I have ever done that - I'm pretty sure there are at least a few more controls...). All I really change is the contrast, brightness, vibrance and saturation. For my Karijini photos I warmed up the white balance and increased the tint to the magenta side for most photos to capture as many colours as possible. I will give you an example of what this does below:
![]() |
| Fortescue Falls, Dales Gorge Karijini. Betsy, at 18mm on tripod, 1/4 second, f/22, ISO 250. |
Same shot, only the colours have been corrected by adjusting the white balance and it's brighter and clearer. You particularly notice it in the water - the water has a slight blue tinge in the first shot, and is white in the second. Could I have done this with my camera on the day I took the shot by adjusting settings? Good question. I like to think not as it was a custom white balance I set on the computer - I already have my camera set to capture slightly saturated images and as I said before, my 18-200mm lens is great at everything but a master of nothing. With more time and fiddling, I could have set a custom white balance on the camera that day, but when you are standing precariously on wet slippery rocks, with your camera pointing down this waterfall and you have to let it go for a few seconds - you want to make as little adjustments as possible!
As I understand it, it is no different than photographers who used to develop their own negatives and get all arty-farty with contrast and colour. Occasionally I mess with hues and gradients but with digital editing I have come to realise that less really is more.
Labels:
Betsy,
colours,
composition,
focal length,
golden-hour,
Gorge,
Karijini,
low light,
misty water,
Nifty-fifty,
panorama,
photomerge,
Photoshop,
Pilbara,
Processing,
RAW,
WA,
water,
waterfall,
white balance
Thursday, March 28, 2013
The HDR Experiment #2
After discovering that, yes, putting in the time to edit RAW images before combining them into a HDR, I thought hey! that probably holds true for panorama's. I love panorama photography. I like capturing as much information as I can with Betsy - as many colours, the biggest scene, the most detail. Less is more most of the time but when you consider with sheer delight how much of the world we see with our eyes, cameras really become pretty pathetic at what they can capture, and editing them is just our attempt to improve something superficial. The master of the world has created gorgeous scenes and colours for us to enjoy every single day. Can you imagine God's computer screen? (I wonder if he operates on Apple or Microsoft...). How much fun must he have mixing all these colours!
But I digress...Panoramas with High Dynamic Range.
My attempt was fruitless. It was virtually impossible for someone as impatient as me to achieve perfect exposure for each of the RAW photos to stitch together, let alone the HDR photos on top of that...For a rainy day I think. (Given that I live in the Pilbara, I won't hold my breath). I like the idea, but I think I better concentrate on getting HDR right first. Small steps.
After my relatively disappointing efforts with HDR with this particular jaunt to Cossack I was quite down-hearted, however the lesson here is to never give up hope. I still believe it doesn't matter how much photographic skill you have, how whiz-bang your camera is, there is always chance. And by chance, I snapped this. This panorama is a combination of four Betsy churn-our JPEGs taken in portrait, with no post-shot editing other than photomerge. This is why I love Betsy...
Let me tell you this was the wrong day to wear open-toed shoes! But it was worth it.
But I digress...Panoramas with High Dynamic Range.
My attempt was fruitless. It was virtually impossible for someone as impatient as me to achieve perfect exposure for each of the RAW photos to stitch together, let alone the HDR photos on top of that...For a rainy day I think. (Given that I live in the Pilbara, I won't hold my breath). I like the idea, but I think I better concentrate on getting HDR right first. Small steps.
After my relatively disappointing efforts with HDR with this particular jaunt to Cossack I was quite down-hearted, however the lesson here is to never give up hope. I still believe it doesn't matter how much photographic skill you have, how whiz-bang your camera is, there is always chance. And by chance, I snapped this. This panorama is a combination of four Betsy churn-our JPEGs taken in portrait, with no post-shot editing other than photomerge. This is why I love Betsy...
Let me tell you this was the wrong day to wear open-toed shoes! But it was worth it.
Saturday, March 23, 2013
DSLR vs Smartphone: Instagram and the question of what kind of image to capture?
Many of you out there would have heard of this little smartphone app. It has grown in popularity. I love it simply because it allows you to share spur of the moment photos on your online social life. It is a little overdone/overused now, and the settings you are given to choose from don't always match your photo. Having said that, I have seen some fabulous images uploaded on this baby!
So, wanting to record my photographic journey I wanted to share with the blogosphere the little critter that joined us for dinner the other night. Oh, I pulled out my DSLR to capture this little guy as well, but with my smartphone, I was able to hold it with one hand while crouched down on an odd angle to capture this little guy, so I could put my thumb next to him to show just how darn small and therefore cute he is!
The composition is not great, but in the heat of the moment, I was able to share this little guy with my friends without little cumbersome photo editing required!
Now check out the image I took with my DSLR. It's cropped and lightened in Photoshop. It's an OK-ish photo, but there is no point of reference to show how tiny he is! I tried to chase him so my husband's phone was in the shot to give an idea, but the little guy was too quick for me
The Instagram photo is more organic I feel - it may not be a higher quality but it captures the moment. As someone who really enjoys taking photos, I have to ask myself - what do I want to capture? A stunning, technically correct photo? A piece of art? Or the moment? Smartphones and technology make it so easy for us to capture anything and everything and store it for eternity. In 1000 years (if we last that long) it is possible that someone will dig up photos being taken today from the ether and examine them like they examine ancient art. What do they want to see? Something technically beautiful, or a moment captured in time? Sometimes though it's worth capturing the moment with our minds and create a memory. The pressure to create lasting art is too much. Plus I felt guilty for momentarily blinding this poor little guy with my flash. And chasing him around.
So, wanting to record my photographic journey I wanted to share with the blogosphere the little critter that joined us for dinner the other night. Oh, I pulled out my DSLR to capture this little guy as well, but with my smartphone, I was able to hold it with one hand while crouched down on an odd angle to capture this little guy, so I could put my thumb next to him to show just how darn small and therefore cute he is!
The composition is not great, but in the heat of the moment, I was able to share this little guy with my friends without little cumbersome photo editing required!
Now check out the image I took with my DSLR. It's cropped and lightened in Photoshop. It's an OK-ish photo, but there is no point of reference to show how tiny he is! I tried to chase him so my husband's phone was in the shot to give an idea, but the little guy was too quick for me
The Instagram photo is more organic I feel - it may not be a higher quality but it captures the moment. As someone who really enjoys taking photos, I have to ask myself - what do I want to capture? A stunning, technically correct photo? A piece of art? Or the moment? Smartphones and technology make it so easy for us to capture anything and everything and store it for eternity. In 1000 years (if we last that long) it is possible that someone will dig up photos being taken today from the ether and examine them like they examine ancient art. What do they want to see? Something technically beautiful, or a moment captured in time? Sometimes though it's worth capturing the moment with our minds and create a memory. The pressure to create lasting art is too much. Plus I felt guilty for momentarily blinding this poor little guy with my flash. And chasing him around.
Subscribe to:
Posts (Atom)


.jpg)