As promised, I attempted a few star trails in my travels over Easter. These suckers are difficult. This is the first time I have found myself wishing for a film camera. Apparently it's easier.
As part of the .com generation, if I don't know something I Google it. Google is a verb, in case you are wondering. According to my extensive research (Wikipedia and photo forums) taking star trails with a bulb setting on a digital camera makes the camera prone to a lot of noise. Coupled with this, the sensor gets hot, creating pixel hot spots - the
RGB dots that confused me last time. (A bulb setting is opening the shutter indefinitely to capture movements of light in low light conditions)
The digital technique - the consensus on the Internet was - to take a whole bunch of 30 second exposure shots, one with the foreground lit up, and a complete black one to reduce noise and then stack them in your processing afterwards. This is a long time to wait if you want long star trails, so I only have four attempts to share. I used the stacking method in Photoshop CS4. I was happy with the results, and learnt a number of valuable long exposure star trail tips:
- Have a full battery - My battery ran out while attempting this at Karijini. It's OK, I had a spare, but not enough to waste on a shot that 'might work later.'
- Have an empty CF card - I did have enough space but only because I shot in JPEG. It also helps to have a good quality card that will write the photo information quickly.
- Remotes are gold - This means the shots are taken as close together as possible with as little break in the trail. I set the camera on continuous shooting and just pressed the remote button and left it at that.
- Use a warm light when lighting the foreground - I only had an LED torch which as you will see, came out very cold.
- Do this on a still night with no clouds and as little light pollution as possible (including the Moon) - The moon interrupted the Karijini shot, and I got some interesting photos of lightening under stars, but the trails peter out. My final test wast interrupted by clouds, and therefore you can see breaks in the trails.
 |
| First attempt at Karijini. Either the tripod wasn't stable or the Image Stabilizer hadn't been turned off on the lens, but the trails are crooked. Plus you can see the light pollution from the Moon. |
 |
| This is quite cool - I got a shooting star effect! Below the stars is where a fence was, but you can see how over time the moon came up and the stars faded - giving the shooting look. |
 |
| Demonstrating the cold light of LED torch, as well as the importance of a still (meaning, no wind) night. There were also clouds that broke the trails. |
 |
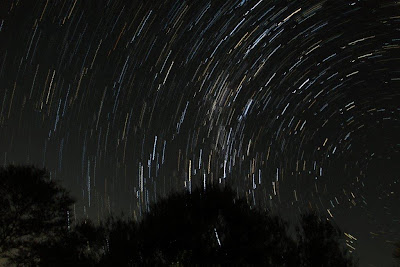
| This is the best of the four - taken at an increased focal length, which I think helped the clarity of the trail. Funnily enough the increased focal length was due to the storm in the distance - for lightning photos, see my Facebook page! |


No comments:
Post a Comment